Example of usage Ansible with Amazon Lightsail
Posted: July 07, 2022 - Updated: July 05, 2026
Ansible is a tool for managing a cluster of computers. It’s idea is simple - working on top of remote ssh, it execute the same command on each registered node. In opposite to classical orchestration tools, where the controller shoult be accessible(online) to dependent nodes, Ansible just requires nodes to be accessible to controller. In simple and popular case, controller is your computer. Even if it has a lot of additional features, in this sample it will be used for automation of deployment java-application to remote host, in this case to Amazon Lightsail node. It is easy, straightforward, and right for that tool. No need to worry about manually connection to the server, uploading artifacts, restart service, etc. Also it is secure, as does’t expose anything except already axposed ssh(22 tcp port).
Acquiring Lightsail node
Just go there: https://lightsail.aws.amazon.com/, register and create a node.
ssh keys
During node creation you will have a choice - either create new, either use existing ssh key. As this was my first run, I create new and the my-key.pem file was downloaded on my computer. ssh can use that to connect, just put key in safe location and grant propriate permissions to the file, like only user readable:
chmod 400 my-key.pem
after you can import that file
> ssh-add my-key.pem
Identity added: my-key.pem (my-key.pem)
Well, this will allow your ssh client to connect to target node. But Ansible by default itself uses traditional, public-key auth. The default can be changed by simply defining my-key.pem in Ansible settings, example. Or just use default, export your public key to target host using scp or ssh-copy-id:
ssh-copy-id -i $HOME/.ssh/id_rsa.pub ubuntu@1.2.3.4
ssh-copy-id is from openssh-client package, if you dont have it, just install it :
sudo apt install openssh-client
IP address of your node.
By default fresh Lightsail instance doesnt have public IP, only private one (in aws network). But that can be changed, aws provide free IP for each node that is in use. Just go to Lightsail’s “network” tab and create one association. Like this:
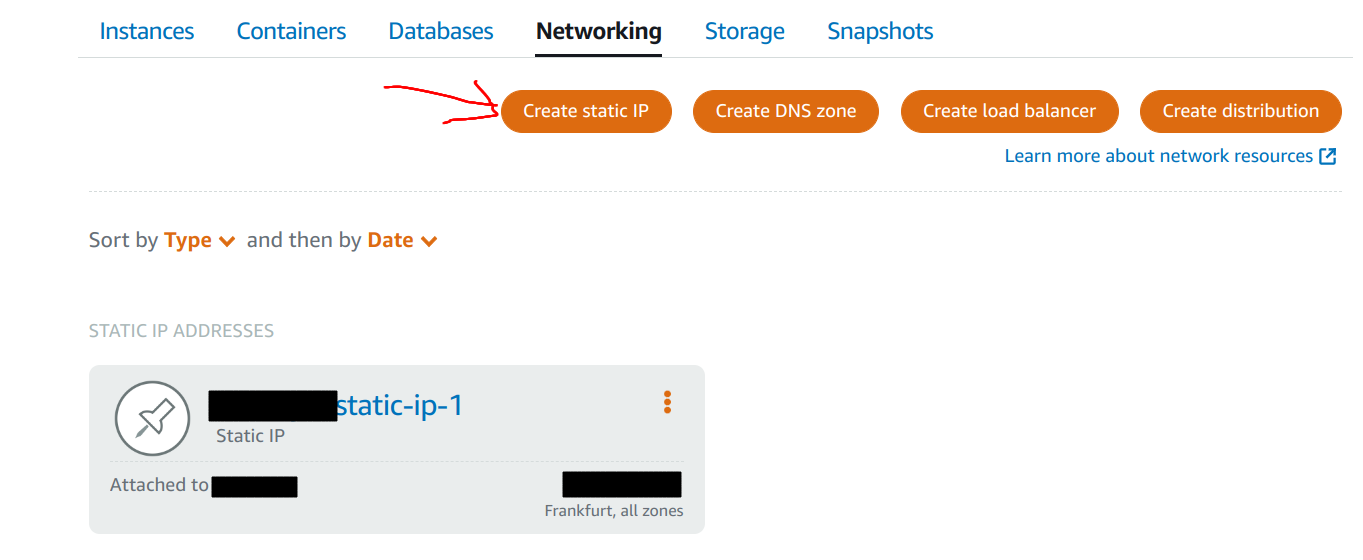
Formal documentation on above: https://lightsail.aws.amazon.com/ls/docs/en_us/articles/lightsail-create-static-ip
Install Ansible
There are many ways to do that. In documentation it suggest install it as python3 module as this will be the fresher version. Still, if you are not about dealing with python libraries, you can install in more sifisticated way some stable version. Instructions on that also in documentation. In my case it as simple as:
> sudo apt update
> sudo apt install software-properties-common
> sudo add-apt-repository --yes --update ppa:ansible/ansible
> sudo apt install ansible
After that you can test your Ansible version:
> ansible --version
Ansible configuration
Ansible is just an executable and it is driven by config files. Main one called ansible.cfg. Search for this file will be in the following order:
- ANSIBLE_CONFIG (environment variable if set)
- ansible.cfg (in the current directory)
- ~/.ansible.cfg (in the home directory)
- /etc/ansible/ansible.cfg
Ansible will process the above list and use the first file found, all others are ignored.
This way, depending on needs the configuration can be: per command, per folder, per user and per machine. There are
ansible-configcommamd that allows to{list,dump,view,init}custom configs.
Important part of the ansible.cfg is inventory key, that is usually point to another INI-like config file.
Sample ansible.cfg:
[defaults]
hostfile = hosts.ini
In that hosts.ini file are listed all the nodes ansible need to operate on.
Sample hostfile:
1.2.3.4 ansible_ssh_user=ubuntu
where 1.2.3.4 is public IP i got from aws. And some extra parameter - in my case target node username was differ from local username, so I have to define that explisitly.
If none hostfile is set in config, default one, located at /etc/ansible/hosts will be used. Also possible to override hostfile location by:
- passing
-i <path>parameter to ansible executable - setting
ANSIBLE_HOSTSenvironment variable:export ANSIBLE_HOSTS=~/hosts
Test run
Having a node, installed software and basic configuration(I used global one), we can try how it actually works.
> ansible -m ping all
1.2.3.4 | SUCCESS => {
    "ansible_facts": {
        "discovered_interpreter_python": "/usr/bin/python3"
    },
    "changed": false,
    "ping": "pong"
}
where:
- -m ping : Module name to execute such as ping, shell, apt, yum and so on
- all : The all means “all hosts.” You can speificy group name such as ‘devservers’ or host names too.
Playbook
Playbook is just a scenario to be run, written is yaml-file.
You can run that using ansible executable directly.
In our case we will have two scenarios:
- install required system libraries and java
- deploy and start/restart our application
Install dependencies
Scenario with comments below
---
# define name of gropus or particular hosts from inventory file
# magic constants:
# `all` is aboul all known hosts from inventory
# `localhost` for local host (see cdocumentation for more setting)
- hosts: all
# `become` is about become someone as. usually about become sudo(or su)
# in this case the scenario defaults for tasks will be current user
  become: no

# root node for defining list of tasks
  tasks:
    - name: Install java role from Ansible Galaxy
      # usually tasks executed to remotes nodes
      # but there are some task kinds that do execued on local machine
      # and `local_action` is kind of generic for those
      # in this case local action is a task of `command` type
      # and a command in this case is:
      # `ansible-galaxy install geerlingguy.java`
      # `ansible-galaxy` is executable that came with ansible
      # it's kind of package manager for community-crafted recepies
      # and in this case we do install locally `geerlingguy.java` community package that is intended to install java
      local_action: command ansible-galaxy install geerlingguy.java
    - name: installing repo for Java 8 in Ubuntu
      # quite simple task that simply add apt repository
      # but it also interesting because of
      # set sudo privilegies for this task
      become: yes
      apt_repository:
        repo: ppa:openjdk-r/ppa
    - name: apt update
      become: yes
      apt:
        update_cache: yes
    - name: Install Java
      when: "ansible_os_family == 'Debian'"
      vars:
        java_packages:
          - openjdk-8-jdk
      # this is a task that run ansible role as a ansible role
      # ansible roles as addons from ansible galaxy
      # these addons usually run before and/or after all tasks
      # but this task allows to run role as a regular step
      include_role:
        name: geerlingguy.java
        # and this relo requires to be run as sudo
        # but the script is not sudo
        # so we apply sudo for entire role as it required
        apply:
          become: true
Save this file as prepare_box.yml and run with
> ansible-playbook prepare_box.yml
Deploy application
Scenario with comments below
---
- hosts: all
  become: no
  # eventually some tasks need to know some information about target node
  # like OS installed or disk space left
  # and those information are collected on each playbook run
  # it took some time so there are options to boost that by caching unchanged facts
  gather_facts: true # default
  # change this on how tasks must run on hosts: sequential or serialized or another strategy
  strategy: linear # default
  # even if this file is declarative definition
  # it still have all the things the regular programing language have
  # like variables with different scopes,
  # tasks results into variables writes
  # and conditions on tasks
  # in this case we simply put the file we need content as a variable
  # later on we will compare this with actual file content and
  # perform actions depends on diference
  vars:
    systemd_service_file: |
      [Unit]
      Description=App service

      [Service]
      User=root
      Group=root
      ExecStart=/usr/bin/java -jar /home/ubuntu/app.jar
      # default stdout at: `sudo journalctl -u app_service`

      [Install]
      WantedBy=multi-user.target

  tasks:
    - name: Build maven artifact locally
      # Ansible is designed to execute commands on remote nodes
      # but it also can execute ones on local machine.
      # Eventually in different scenarios is needed to either
      # call some utility, move a file, interact services, etc.
      # Below is short syntax
      local_action: shell mvn clean package
      # But also alternative full one:
      # local_action:
      #      module: shell
      #      cmd: mvn clean package
      # Read more there:
      # https://stackoverflow.com/a/56050507/449553
      #
    - name: Deploy artifact
      copy:
        src: "{{ item }}"
        dest: ~/app.jar
        mode: u=rwx,g=rx,o=rx
      with_fileglob:
        - "target/*.jar"
  - name: Systemd file exists
    become: yes
    stat:
      path: /etc/systemd/system/app_service.service
      checksum_algorithm: md5
    register: app_service_stat
  - name: Setting facts
    become: no
    set_fact:
      # since missing file has no checksum, use "false" value instead
      remote_file_sum: "{{ app_service_stat.stat.checksum | default(false) }}"
      # anything: "{{ as.as.as.as.as | default('not as') }}" <- works!
      # or that: # remote_file_sum: "{{ app_service_stat.stat.exists | ternary(app_service_stat.stat.checksum, false) }}"  local_file_sum: "{{ systemd_service_file | hash('md5') }}"
      cacheable: no # 'no' is default, if yes, will be cached on remote host/sequential playbook run
  - name: Systemd file debug integrity
    vars:
      msg: |-
          Remote systemd file exists: {{ app_service_stat.stat.exists }}
          Remote systemd file checksum: {{ remote_file_sum }}
          Valid systemd file checksum: {{ local_file_sum }}
      debug:
        # instead of printing message directly here
        # I use task variable defined above
        # and print that with skipping empty line (last one as a result of split)
        # these all are just because "msg" print JSON, so \n will be "\n"
        # but if print content as array of lines, it looks nicer  msg: "{{ msg.split('\n') | reject('match', '^$') }}"
  - name: Creating systemd service file if changed
    when: remote_file_sum != local_file_sum
    become: yes
    copy:
      dest: "/etc/systemd/system/app_service.service"
      mode: u=rwx,g=rx,o=rx
      owner: root
      group: root
      content: "{{systemd_service_file}}"
  - name: Start app service
    become: yes
    systemd:
      name: app_service
      enabled: yes
      state: restarted
      daemon_reload: yes
  # `name` attribute is optional btw
  - wait_for:
      port: 80
Save this file as install_app.yml and run with
> ansible-playbook install_app.yml
More power with Ansible lightsail module
If fact, Ansible can manage lightsail for its own - it can create instances, delete them, etc. Take a look on the module: community.aws.lightsail module – Manage instances in AWS Lightsail
Used resources
- Deploying a service using ansible and systemd
- How To Deploy a Basic PHP Application Using Ansible on Ubuntu
- How to Install and Configure latest version of Ansible on Ubuntu Linux
Short usefull explanations:
Written with StackEdit.